Battery switch on travel trailer function is crucial for managing your RV’s power. Understanding how your battery switch works is key to preventing dead batteries, maximizing battery life, and ensuring your appliances function correctly. This guide breaks down the different types of switches, their wiring, troubleshooting, and essential safety precautions. We’ll cover everything from simple single-battery setups to more complex systems with multiple batteries and inverters, so you can confidently maintain your travel trailer’s electrical system.
We’ll explore the various types of switches available, detailing their pros and cons and helping you choose the right one for your needs. We’ll also delve into the wiring diagrams, providing clear visuals to guide you through the process of understanding and, if necessary, repairing your system. Safety is paramount, so we’ll cover essential precautions to ensure you work safely with your RV’s electrical system.
Types of Battery Switches in Travel Trailers
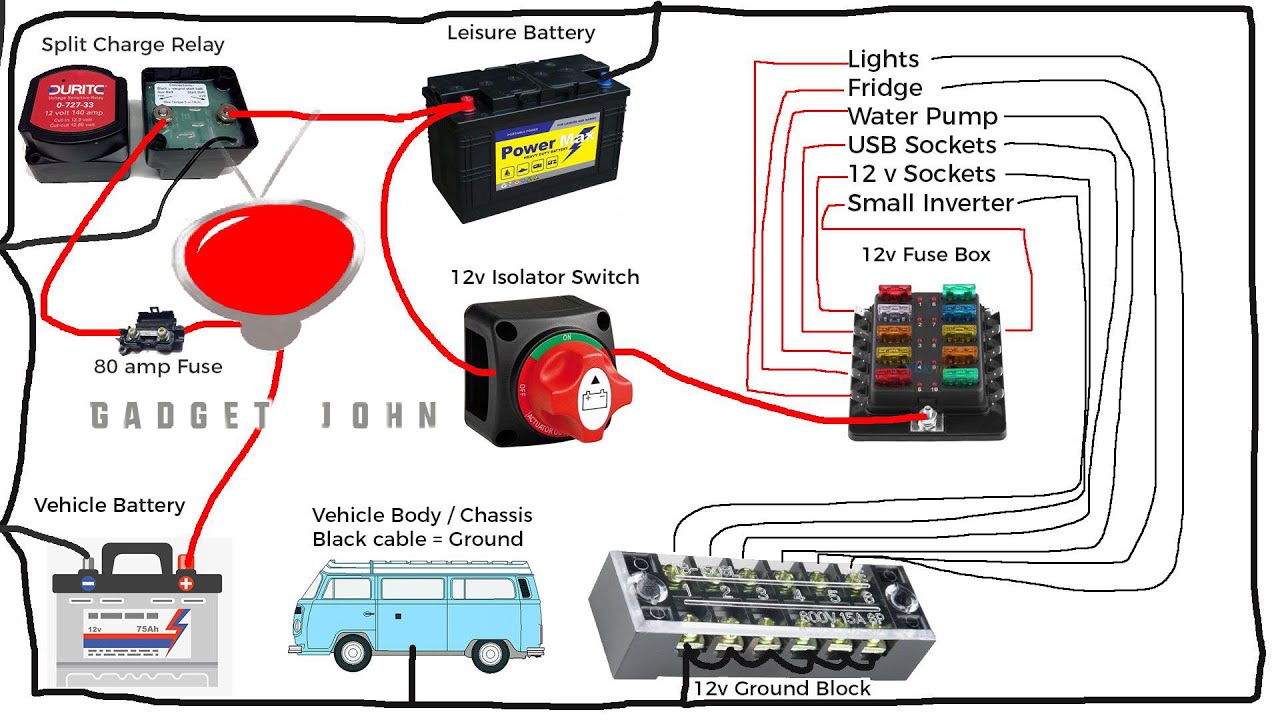
Choosing the right battery switch for your travel trailer is crucial for managing your power sources effectively and safely. Different types offer varying levels of control and protection, each with its own set of advantages and disadvantages. Understanding these differences will help you select the best option for your needs.
Single-Pole Battery Switches
Single-pole switches are the simplest type. They offer ON and OFF functionality for a single battery, typically the main trailer battery. They’re relatively inexpensive and easy to install, making them a popular choice for smaller setups or those with only one battery. However, they lack the ability to isolate or switch between multiple batteries.
So, you’re planning a trip? Awesome! First things first: get yourself sorted with travel insurance. Check out Aon travel insurance for some solid options; they’ve got you covered. Then, if you’re an audiophile like me, don’t forget your tunes! Seriously consider a good audiophile travel setup to make those long journeys more enjoyable.
Proper planning makes for a smoother, more enjoyable trip, right?
Double-Pole Battery Switches
Double-pole switches provide more control than single-pole switches. They control both positive and negative terminals of a single battery, offering a complete disconnect. This is a significant safety advantage, allowing for a full power cut-off when needed. While more expensive than single-pole switches, the added safety and clean power disconnect are worth considering.
Double-Pole Double-Throw (DPDT) Battery Switches
DPDT switches are the most versatile option. They allow you to switch between two different batteries (like a house battery and a starting battery) or to connect both to the trailer’s electrical system simultaneously. This is ideal for larger trailers with separate battery banks for different systems (house appliances vs. engine starting). They offer the highest level of control but are also the most complex and expensive to install.
Comparison of Battery Switch Types, Battery switch on travel trailer function
| Feature | Single-Pole | Double-Pole | Double-Pole Double-Throw (DPDT) |
|---|---|---|---|
| Number of Batteries Controlled | One | One | Two (or the ability to switch between two or connect both) |
| Safety Features | Basic ON/OFF | Complete disconnect (positive and negative) | Complete disconnect for each battery; selection of which battery powers the system |
| Complexity | Low | Medium | High |
| Cost | Low | Medium | High |
| Typical Application | Small trailers, single battery systems | Most trailers, enhanced safety needed | Larger trailers, multiple battery banks |
Troubleshooting Common Issues

Travel trailer battery switches, while relatively simple devices, can sometimes malfunction, leaving you stranded without power. Understanding common problems and troubleshooting techniques is crucial for maintaining your RV’s electrical system. This section will guide you through identifying and resolving some of the most frequent issues.
Switch Failure
A battery switch itself can fail due to wear and tear, particularly if it’s frequently used or exposed to harsh environmental conditions. The internal components might become damaged, leading to an inability to switch power on or off correctly. Sometimes, the switch might feel stiff or difficult to operate, indicating a problem. A completely unresponsive switch is a clear sign of failure and necessitates replacement.
This is usually a straightforward repair, involving removing the old switch and installing a new one of the same type and amperage rating. Remember to always disconnect the battery before working on any electrical components.
Corroded Connections
Corrosion is a common enemy of electrical connections, and battery switches are no exception. Over time, moisture and oxidation can build up on the terminals, creating a high-resistance connection that prevents proper current flow. This often manifests as dim lights, slow charging, or complete power failure. Identifying corroded connections is relatively easy; they usually appear green or white.
Cleaning these connections involves using a wire brush or sandpaper to remove the corrosion and then applying a corrosion inhibitor or dielectric grease to prevent future corrosion.
Blown Fuses
Fuses are safety devices designed to protect the electrical system from overloads. If a short circuit or excessive current draw occurs, the fuse will blow, interrupting the power flow and preventing damage to other components. A blown fuse will appear visibly broken or with a melted internal wire. Replacing a blown fuse is usually a simple process, but it’s important to use a fuse of the correct amperage rating.
Using a higher-amperage fuse can lead to a fire hazard. If a fuse blows repeatedly, it indicates a more serious underlying problem in the circuit that needs to be addressed. Before replacing the fuse, you should investigate the cause of the overload.
Troubleshooting a Non-Functional Battery Switch
Troubleshooting starts with a visual inspection. Check for obvious signs of damage to the switch itself, loose wires, or corrosion at the terminals. Next, use a multimeter to test the continuity of the switch. First, ensure the switch is in the “off” position. Place the multimeter’s probes on the input and output terminals of the switch.
So, you’re planning a trip? Awesome! First things first: get yourself sorted with travel insurance. Check out Aon travel insurance for solid coverage. Then, if you’re an audiophile like me, you’ll want to look into your sound setup. A good audiophile travel setup can make all the difference to your journey, transforming even long flights into enjoyable experiences.
Don’t forget to pack your headphones!
If you read zero ohms (or a very low resistance), the switch is closed, indicating a problem with the switch mechanism. If you read infinite ohms (or a very high resistance), the switch is open, indicating that the switch itself may not be the problem. Repeat this test with the switch in the “on” position; you should now read zero ohms.
If not, the switch is faulty. Remember to always disconnect the battery negative terminal before testing any electrical components.
Safely Testing the Battery Switch and Circuits with a Multimeter
A multimeter is an essential tool for electrical troubleshooting. Before starting any testing, ensure the battery’s negative terminal is disconnected. When testing continuity, set the multimeter to the ohms setting. When testing voltage, select the appropriate DC voltage range. Always be careful to avoid touching the probes to bare metal or other conductive surfaces while the multimeter is connected to a live circuit.
Testing the voltage at the battery terminals will confirm if the battery is supplying power. Testing the voltage at the output terminals of the switch will confirm if the switch is allowing current to flow. Low or zero voltage at the output terminals, with the switch in the “on” position and the battery providing power, indicates a problem with the switch or wiring.
Always refer to your RV’s wiring diagram for specific circuit information.
Safety Considerations
Working with your travel trailer’s electrical system, especially the battery and its switch, requires a cautious approach. Neglecting safety precautions can lead to serious injury or damage to your equipment. Understanding the potential hazards and following proper safety procedures is crucial for a safe and enjoyable RV experience.Properly disconnecting the battery before any electrical work is paramount. This simple step prevents accidental shocks, short circuits, and potential fires.
Even seemingly minor tasks should be preceded by this essential safety measure. Remember, electricity is invisible but potentially lethal.
Battery Handling Precautions
Working with lead-acid batteries, commonly found in travel trailers, presents specific hazards. These batteries contain corrosive acid and can release explosive hydrogen gas if mishandled. Always wear appropriate safety gear, including eye protection and gloves, when working near or with batteries. Ensure adequate ventilation to avoid inhaling potentially harmful fumes.
Electrical System Safety Guidelines
A comprehensive safety approach is essential when dealing with any part of your travel trailer’s electrical system. This includes, but is not limited to, the battery switch and wiring. The following guidelines will help minimize risks and ensure safe operation.
- Always disconnect the negative (-) battery terminal first before performing any work on the electrical system. This helps prevent accidental short circuits.
- Use insulated tools to avoid accidental contact with live wires. Never work on the electrical system when wet or in damp conditions.
- Inspect all wiring for damage or fraying before connecting or disconnecting anything. Replace any damaged wiring immediately.
- Familiarize yourself with the location of your trailer’s circuit breakers and fuses. Know how to safely reset them and replace blown fuses.
- Never work on the electrical system while the battery is connected. Always double-check that the battery is disconnected before starting any work.
- If you are unsure about any aspect of the electrical system, consult a qualified RV technician. Improper repairs can lead to serious hazards.
- Keep children and pets away from the battery and electrical components at all times. Batteries contain corrosive acid that can cause serious burns.
- Properly dispose of old or damaged batteries according to local regulations. Improper disposal can harm the environment.
Mastering your travel trailer’s battery switch is about more than just turning power on and off; it’s about understanding your RV’s electrical system and ensuring reliable power for your adventures. By understanding the different switch types, their functions, and safety procedures, you can confidently maintain your system and prevent costly repairs. Regular maintenance, as Artikeld in this guide, will extend the life of your batteries and your battery switch, keeping you powered up on the road for years to come.
So, get familiar with your switch, and happy travels!
Essential FAQs: Battery Switch On Travel Trailer Function
What happens if my battery switch is faulty?
A faulty switch can lead to power loss, inconsistent operation of appliances, or even damage to your batteries. You might experience flickering lights, non-functioning appliances, or complete power failure.
How often should I inspect my battery switch?
Inspect your battery switch at least once a year, or more frequently if you use your trailer often in harsh conditions. Check for corrosion, loose connections, and any signs of damage.
Can I replace my battery switch myself?
While possible, replacing a battery switch requires basic electrical knowledge and some DIY skills. If unsure, consult a qualified RV technician.
How do I know which battery switch is right for my travel trailer?
The correct switch depends on your trailer’s electrical system and the number of batteries you have. Consult your owner’s manual or a qualified RV technician for assistance.
